首页 > 基础资料 博客日记
springboot 安装指南
2023-07-24 17:28:40基础资料围观619次
Java资料网推荐springboot 安装指南这篇文章给大家,欢迎收藏Java资料网享受知识的乐趣
目录
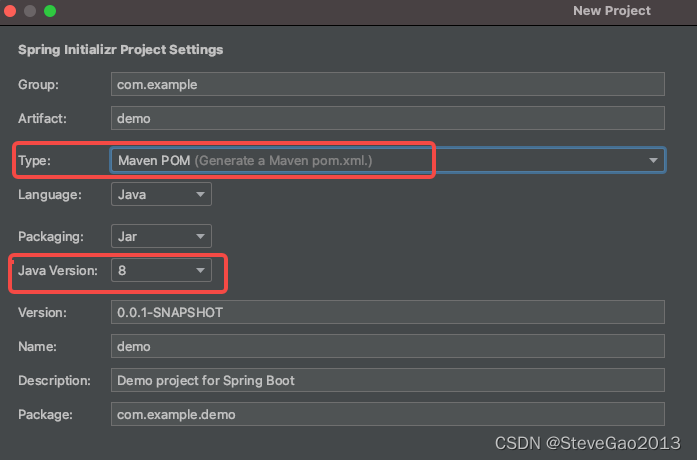
选择Spring boot Maven项目,并使用java8, Springboot 3.0就默认使用java17
在pom.xml中引入 mysql 和 mybatis-plus
在resources目录中新建bootstrap.yml 并编写内容
3、在nacos编写application.properties
1、创建springboot工程(idea)
首先需要安装idea,然后选择新建工程。


选择Spring boot Maven项目,并使用java8, Springboot 3.0就默认使用java17


工程建好后,修改pom.xml中 springboot的版本,用来匹配后续nacos的使用。
修改springboot 版本为2.3.2.RELEASE。

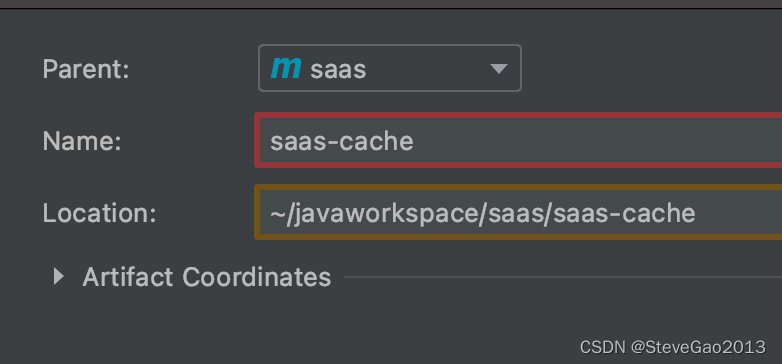
创建2个模款 saas-web和saas-dao


在pom.xml中引入 mysql 和 mybatis-plus
        <dependency>
            <groupId>com.baomidou</groupId>
            <artifactId>mybatis-plus-boot-starter</artifactId>
            <version>3.4.3.4</version>
        </dependency>
        <dependency>
            <groupId>mysql</groupId>
            <artifactId>mysql-connector-java</artifactId>
            <version>5.1.46</version>
        </dependency>
创建数据表user
CREATE TABLE `user` (
  `id` bigint(20) unsigned NOT NULL,
  `country` varchar(45) NOT NULL DEFAULT '' COMMENT '国家',
  `mobile` varchar(12) NOT NULL COMMENT '手机号码',
  `password` varchar(32) DEFAULT NULL COMMENT '用户密码',
  `status` tinyint(1) NOT NULL DEFAULT '1' COMMENT '用户状态',
  `created_at` int(11) DEFAULT NULL COMMENT '创建日期',
  `updated_at` int(11) DEFAULT NULL COMMENT '更新日期',
  `salt` varchar(16) DEFAULT NULL COMMENT '密码盐',
  PRIMARY KEY (`id`),
  UNIQUE KEY `idx_mobile` (`mobile`,`country`) USING BTREE COMMENT '''手机号码''',
  KEY `idx_created_at` (`created_at`)
) ENGINE=InnoDB DEFAULT CHARSET=utf8mb4 COMMENT='用户表';
在saas-dao模款中创建实体类
package com.xxx.saas.entity.user;

import com.baomidou.mybatisplus.annotation.IdType;
import com.baomidou.mybatisplus.annotation.TableField;
import com.baomidou.mybatisplus.annotation.TableId;
import com.baomidou.mybatisplus.annotation.TableName;
import lombok.Data;

@TableName("user")
@Data
public class User {

    @TableId(type = IdType.ASSIGN_ID)
    private Long id;

    private String country;

    private String mobile;

    private String password;

    private Short status;

    @TableField("created_at")
    private Integer createdAt;

    @TableField("updated_at")
    private Integer updatedAt;

    private String salt;
}
在saas-dao模块中创建mapper
package com.xxx.saas.mapper.user;

import com.baomidou.mybatisplus.core.mapper.BaseMapper;
import com.xxx.saas.entity.user.User;

import javax.annotation.Resource;

@Resource
public interface UserMapper extends BaseMapper<User> {


}
在saas-web中创建控制器
package com.xxx.saas.controller.user;

import com.xxx.saas.cache.user.UserCache;
import com.xxx.saas.entity.user.User;
import com.xxx.saas.mapper.user.UserMapper;
import org.springframework.beans.factory.annotation.Autowired;
import org.springframework.web.bind.annotation.GetMapping;
import org.springframework.web.bind.annotation.RequestMapping;
import org.springframework.web.bind.annotation.RestController;

@RestController
@RequestMapping("/")
public class UserController {

    @Autowired
    private UserMapper userMapper;

    @Autowired
    private UserCache userCache;
    @GetMapping("index")
    public User getList()
    {
        User users = userCache.getUser("138388711962");
        return users;
    }

    @GetMapping("delete")
    public String deleteUser()
    {
        userCache.deleteUser("138388711962");
        return "success";
    }
}
2、安装nacos组件
需要先安装nacos 2.0.3
在pom.xml中增加如下 代码
        <dependency>
            <groupId>com.alibaba.cloud</groupId>
            <artifactId>spring-cloud-starter-alibaba-nacos-config</artifactId>
            <version>2.2.6.RELEASE</version>
        </dependency>
注意:不能使用原来的application.yml作为配置文件,而是新建一个bootstrap.yml作为配置文件
配置文件优先级(由高到低):
bootstrap.properties > bootstrap.yml > application.properties > application.yml
在resources目录中新建bootstrap.yml 并编写内容
spring:
  application:
    name: xxx-ucenter #配置名称
  cloud:
    nacos:
      config:
        server-addr: 1.11.111.1:8088 #nacos服务器地址
        group: DEFAULT_GROUP    #默认分组
        namespace: xxx-dc    #命名空间
        file-extension: properties #扩展类型
        refresh-enabled: true
在saas-web中创建启动类WebApp
package com.xxx.saas;

import org.mybatis.spring.annotation.MapperScan;
import org.springframework.boot.SpringApplication;
import org.springframework.boot.autoconfigure.SpringBootApplication;

@SpringBootApplication(scanBasePackages = {"com.xxx.*"})

@MapperScan("com.xxx.saas.mapper")
public class WebApp {
    public static void main(String[] args) {
        SpringApplication.run(WebApp.class, args);
    }
}
3、集成数据库连接池
在nacos配置文件中配置
server.port=8080
spring.datasource.driver-class-name=com.mysql.jdbc.Driver
spring.datasource.druid.url=jdbc:mysql://localhost:3306/test?useSSL=false&characterEncoding=UTF-8&?useUnicode=true
spring.datasource.druid.username=root
spring.datasource.druid.password=root
spring.datasource.druid.max-active=100
spring.datasource.druid.initial-size=10
spring.datasource.druid.min-idle=5
spring.datasource.druid.min-evictable-idle-time-millis=300000
spring.datasource.druid.max-wait=60000
spring.datasource.druid.validation-query=select 1
spring.datasource.druid.test-on-borrow=true
spring.datasource.druid.test-on-return=true
spring.datasource.druid.test-while-idle=true
spring.datasource.druid.time-between-connect-error-millis=60000
mybatis-plus.configuration.log-impl=org.apache.ibatis.logging.stdout.StdOutImpl
4、安装springboot-redis
1、创建saas-cache模块。

2、安装redis依赖
        <dependency>
            <groupId>org.springframework.boot</groupId>
            <artifactId>spring-boot-starter-data-redis</artifactId>
        </dependency>
        <dependency>
            <groupId>org.apache.commons</groupId>
            <artifactId>commons-pool2</artifactId>
            <version>2.6.2</version>
        </dependency>
3、在nacos编写application.properties
spring.redis.host=11.111.34.211
spring.redis.port=6379
spring.redis.database=0
spring.redis.password=root
spring.redis.lettuce.pool.max-active=100
spring.redis.lettuce.pool.max-wait=1
spring.redis.lettuce.pool.max-idle=10
spring.redis.lettuce.pool.min-idle=0
spring.redis.timeout=5000
4、编写配置类
package com.xxx.saas.config;

import com.fasterxml.jackson.annotation.JsonAutoDetect;
import com.fasterxml.jackson.annotation.PropertyAccessor;
import com.fasterxml.jackson.databind.ObjectMapper;
import org.springframework.cache.CacheManager;
import org.springframework.cache.annotation.CachingConfigurerSupport;
import org.springframework.context.annotation.Bean;
import org.springframework.context.annotation.Configuration;
import org.springframework.data.redis.cache.RedisCacheConfiguration;
import org.springframework.data.redis.cache.RedisCacheManager;
import org.springframework.data.redis.connection.RedisConnectionFactory;
import org.springframework.data.redis.core.RedisTemplate;
import org.springframework.data.redis.serializer.Jackson2JsonRedisSerializer;
import org.springframework.data.redis.serializer.RedisSerializationContext;
import org.springframework.data.redis.serializer.RedisSerializer;
import org.springframework.data.redis.serializer.StringRedisSerializer;

import java.time.Duration;

@Configuration
public class RedisConfig extends CachingConfigurerSupport {
    @Bean
    public RedisTemplate<String, Object> redisTemplate(RedisConnectionFactory factory)
    {
        RedisTemplate<String, Object> template = new RedisTemplate<>();
        RedisSerializer<String> redisSerializer = new StringRedisSerializer();
        Jackson2JsonRedisSerializer jackson2JsonRedisSerializer = new
                Jackson2JsonRedisSerializer(Object.class);
        ObjectMapper om = new ObjectMapper();
        om.setVisibility(PropertyAccessor.ALL, JsonAutoDetect.Visibility.ANY);
        om.enableDefaultTyping(ObjectMapper.DefaultTyping.NON_FINAL);
        jackson2JsonRedisSerializer.setObjectMapper(om);
        template.setConnectionFactory(factory);
        //key序列化方式
        template.setKeySerializer(redisSerializer);
        //value序列化
        template.setValueSerializer(jackson2JsonRedisSerializer);
        //value hashmap序列化
        template.setHashValueSerializer(jackson2JsonRedisSerializer);
        return template;
    }

    @Bean
    public CacheManager cacheManager(RedisConnectionFactory factory) {
        RedisSerializer<String> redisSerializer = new StringRedisSerializer();
        Jackson2JsonRedisSerializer jackson2JsonRedisSerializer = new
                Jackson2JsonRedisSerializer(Object.class);
        //解决查询缓存转换异常的问题
        ObjectMapper om = new ObjectMapper();
        om.setVisibility(PropertyAccessor.ALL, JsonAutoDetect.Visibility.ANY);
        om.enableDefaultTyping(ObjectMapper.DefaultTyping.NON_FINAL);
        jackson2JsonRedisSerializer.setObjectMapper(om);
        // 配置序列化(解决乱码的问题),过期时间600秒
        RedisCacheConfiguration config =
                RedisCacheConfiguration.defaultCacheConfig()
                        .entryTtl(Duration.ofSeconds(600))
                        .serializeKeysWith(RedisSerializationContext.SerializationPair.fromSerializer(redisSerializer))
                        .serializeValuesWith(RedisSerializationContext.SerializationPair.fromSerializer(jackson2JsonRedisSerializer))
                        .disableCachingNullValues();
        RedisCacheManager cacheManager = RedisCacheManager.builder(factory)
                .cacheDefaults(config)
                .build();
        return cacheManager;
    }
}
5、编写注解缓存类
package com.xxx.saas.cache.user;

import com.baomidou.mybatisplus.core.conditions.query.QueryWrapper;
import com.xxx.saas.entity.user.User;
import com.xxx.saas.mapper.user.UserMapper;
import org.springframework.beans.factory.annotation.Autowired;
import org.springframework.cache.annotation.CacheEvict;
import org.springframework.cache.annotation.Cacheable;
import org.springframework.stereotype.Component;

@Component
public class UserCache {

    @Autowired
    private UserMapper userMapper;

    //生成缓存
    @Cacheable(key = "#mobile", cacheNames = "user")
    public User getUser(String mobile)
    {
        QueryWrapper<User> oneUser = new QueryWrapper<>();
        oneUser.eq("mobile", mobile);
        return userMapper.selectOne(oneUser);
    }

    //删除缓存
    @CacheEvict(key = "#mobile", cacheNames = "user")
    public void deleteUser(String mobile)
    {

    }
}
5、启动springboot
2022-03-02 17:44:53.745  INFO 12331 --- [  restartedMain] o.s.b.w.embedded.tomcat.TomcatWebServer  : Tomcat initialized with port(s): 8089 (http)
2022-03-02 17:44:53.750  INFO 12331 --- [  restartedMain] o.apache.catalina.core.StandardService   : Starting service [Tomcat]
2022-03-02 17:44:53.750  INFO 12331 --- [  restartedMain] org.apache.catalina.core.StandardEngine  : Starting Servlet engine: [Apache Tomcat/9.0.37]
2022-03-02 17:44:53.785  INFO 12331 --- [  restartedMain] o.a.c.c.C.[Tomcat].[localhost].[/]       : Initializing Spring embedded WebApplicationContext
2022-03-02 17:44:53.785  INFO 12331 --- [  restartedMain] w.s.c.ServletWebServerApplicationContext : Root WebApplicationContext: initialization completed in 459 ms
Logging initialized using 'class org.apache.ibatis.logging.stdout.StdOutImpl' adapter.
2022-03-02 17:44:53.856  INFO 12331 --- [  restartedMain] c.a.d.s.b.a.DruidDataSourceAutoConfigure : Init DruidDataSource
2022-03-02 17:44:55.119  INFO 12331 --- [  restartedMain] com.alibaba.druid.pool.DruidDataSource   : {dataSource-1} inited
表示端口已经启动。
访问网站:
返回数据:http://127.0.0.1:8089/index
删除缓存:http://127.0.0.1:8089/delete
注:部分资源转载于网络,如有侵权,请联系本人,即刻删除。
文章来源:https://blog.csdn.net/gyk163/article/details/129305371
本文来自互联网用户投稿,该文观点仅代表作者本人,不代表本站立场。本站仅提供信息存储空间服务,不拥有所有权,不承担相关法律责任。如若内容造成侵权/违法违规/事实不符,请联系邮箱:jacktools123@163.com进行投诉反馈,一经查实,立即删除!
本文来自互联网用户投稿,该文观点仅代表作者本人,不代表本站立场。本站仅提供信息存储空间服务,不拥有所有权,不承担相关法律责任。如若内容造成侵权/违法违规/事实不符,请联系邮箱:jacktools123@163.com进行投诉反馈,一经查实,立即删除!
标签:

