首页 > 基础资料 博客日记
线程状态转换?创建线程的几种方式?线程如何停止?
2024-09-24 23:30:03基础资料围观603次
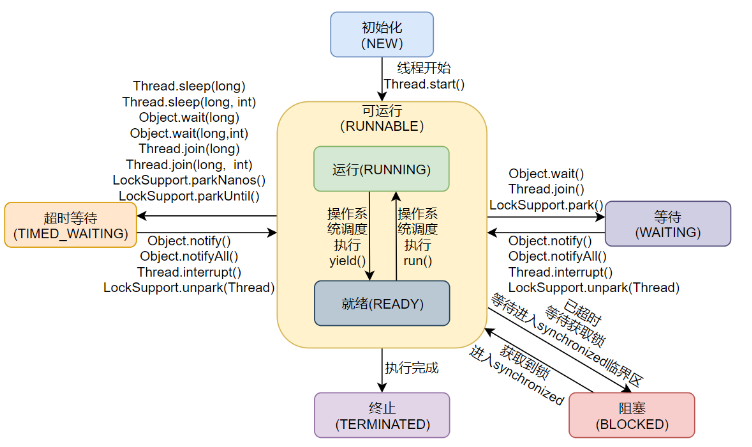
线程状态转换

新建(New)
NEW:初始状态,线程被构建,但是还没有调用start()方法。
可运行(Runnable)
RUNNABLE:可运行状态,可运行状态可以包括:运行中状态和就绪状态。也就是 可能正在运行,也可能正在等待 CPU 时间片。
包含了操作系统线程状态中的 Running 和 Ready。
阻塞(Blocking)
等待获取一个排它锁,如果其线程释放了锁就会结束此状态。
 new Thread(new BlockedDemo(),"Blocked-Demo-1").start();
 new Thread(new BlockedDemo(),"Blocked-Demo-2").start();

static class BlockedDemo extends Thread {
    @Override
    public void run() {
        while (true) {
            synchronized (BlockedDemo.class) {
                try {
                    TimeUnit.SECONDS.sleep(100);
                } catch (InterruptedException e) {
                    e.printStackTrace();
                }
            }
        }
    }
}

无限期等待(Waiting)
等待其它线程显式地唤醒,否则不会被分配 CPU 时间片。
| 进入方法 | 退出方法 |
|---|---|
| 没有设置 Timeout 参数的 Object.wait() 方法 | Object.notify() / Object.notifyAll() |
| 没有设置 Timeout 参数的 Thread.join() 方法 | 被调用的线程执行完毕 |
| LockSupport.park() 方法 | - |
new Thread(() -> {
    while (true) {
        synchronized (Test5.class) {
            try {
                Test5.class.wait();
            } catch (InterruptedException e) {
                e.printStackTrace();
            }
        }
    }
},"Waiting-Demo").start();

限期等待(Timed Waiting)
无需等待其它线程显式地唤醒,在一定时间之后会被系统自动唤醒。
调用 Thread.sleep() 方法使线程进入限期等待状态时,常常用“使一个线程睡眠”进行描述。
调用 Object.wait() 方法使线程进入限期等待或者无限期等待时,常常用“挂起一个线程”进行描述。
睡眠和挂起是用来描述行为,而阻塞和等待用来描述状态。
阻塞和等待的区别在于,阻塞是被动的,它是在等待获取一个排它锁。而等待是主动的,通过调用 Thread.sleep() 和 Object.wait() 等方法进入。
| 进入方法 | 退出方法 |
|---|---|
| Thread.sleep() 方法 | 时间结束 |
| 设置了 Timeout 参数的 Object.wait() 方法 | 时间结束 / Object.notify() / Object.notifyAll() |
| 设置了 Timeout 参数的 Thread.join() 方法 | 时间结束 / 被调用的线程执行完毕 |
| LockSupport.parkNanos() 方法 | - |
| LockSupport.parkUntil() 方法 | - |
new Thread(() -> {
    while (true) {
        try {
            TimeUnit.SECONDS.sleep(100);
        } catch (InterruptedException e) {
            e.printStackTrace();
        }
    }
}, "Time-Waiting-Demo").start();

死亡(Terminated)
可以是线程结束任务之后自己结束,或者产生了异常而结束。
创建线程的几种方式
有三种使用线程的方法:
-
实现 Runnable 接口;
-
实现 Callable 接口;
-
继承 Thread 类。
-
使用线程池
实现 Runnable 和 Callable 接口的类只能当做一个可以在线程中运行的任务,不是真正意义上的线程,因此最后还需要通过 Thread 来调用。可以说任务是通过线程驱动从而执行的。
继承 Thread 类
同样也是需要实现 run() 方法,因为 Thread 类也实现了 Runable 接口。
当调用 start() 方法启动一个线程时,虚拟机会将该线程放入就绪队列中等待被调度,当一个线程被调度时会执行该线程的 run() 方法。
public class MyThread extends Thread {
    public void run() {
        // ...
    }
}
public static void main(String[] args) {
   MyThread mt = new MyThread();
   mt.start();
}
实现 Runnable 接口
需要实现 run() 方法。
通过 Thread 调用 start() 方法来启动线程。
public class MyRunnable implements Runnable {
    public void run() {
        // ...
    }
}
public static void main(String[] args) {
    MyRunnable instance = new MyRunnable();
    Thread thread = new Thread(instance);
    thread.start();
}
实现 Callable 接口
与 Runnable 相比,Callable 可以有返回值,返回值通过 FutureTask 进行封装。
public class MyCallable implements Callable<Integer> {
    public Integer call() {
        return 123;
    }
}
public static void main(String[] args) throws ExecutionException, InterruptedException {
    MyCallable mc = new MyCallable();
    FutureTask<Integer> ft = new FutureTask<>(mc);
    Thread thread = new Thread(ft);
    thread.start();
    System.out.println(ft.get());
}
或者可以使用线程池进行执行
MyCallable myCallable = new MyCallable();
ExecutorService executorService = Executors.newFixedThreadPool(1);
Future<String> submit = executorService.submit(myCallable);
System.out.println(submit.get());
实现接口 VS 继承 Thread
实现接口会更好一些,因为:
-
Java 不支持多重继承,因此继承了 Thread 类就无法继承其它类,但是可以实现多个接口;
-
类可能只要求可执行就行,继承整个 Thread 类开销过大。
基础线程机制
Daemon
守护线程是程序运行时在后台提供服务的线程,不属于程序中不可或缺的部分。
当所有非守护线程结束时,程序也就终止,同时会杀死所有守护线程。
main() 属于非守护线程。因此如果设置这个,可以让子线程随着主线程的退出而退出
使用 setDaemon() 方法将一个线程设置为守护线程。
public static void main(String[] args) {
    Thread thread = new Thread(new MyRunnable());
    thread.setDaemon(true);
}
sleep()
Thread.sleep(millisec) 方法会休眠当前正在执行的线程,millisec 单位为毫秒。
sleep的工作流程:
- 挂起线程并修改其运行状态
- 用sleep()提供的参数来设置一个定时器
- 当时间结束定时器会触发,内核收到中断后修改线程的运行状态。就绪队列等待调度例如线程会被标志为就绪而进入就绪队列等待调度
sleep() 可能会抛出 InterruptedException,因为异常不能跨线程传播回 main() 中,因此必须在本地进行处理。线程中抛出的其它异常也同样需要在本地进行处理。
public void run() {
    try {
        Thread.sleep(3000);//并不意味着3秒后一定会执行,因为此时并不一定会将CPU资源分配给这个线程
    } catch (InterruptedException e) {
        e.printStackTrace();
    }
}
sleep(0)的妙用
在线程中,调用sleep(0)可以释放cpu时间,让线程马上重新回到就绪队列而非等待队列,sleep(0)释放当前线程所剩余的时间片(如果有剩余的话),这样可以让操作系统切换其他线程来执行,提升效率。
Thread.Sleep(0) 并非是真的要线程挂起0毫秒,意义在于这次调用Thread.Sleep(0)的当前线程确实的被冻结了一下,让其他线程有机会优先执行。Thread.Sleep(0) 是你的线程暂时放弃cpu,也就是释放一些未用的时间片给其他线程或进程使用,就相当于一个让位动作。其实就等同于yield的用法
yield()
对静态方法 Thread.yield() 的调用声明了当前线程已经完成了生命周期中最重要的部分,可以切换给其它线程来执行。该方法只是对线程调度器的一个建议,而且也只是建议具有相同优先级的其它线程可以运行。
public void run() {
    Thread.yield();
}
线程停止
stop方法
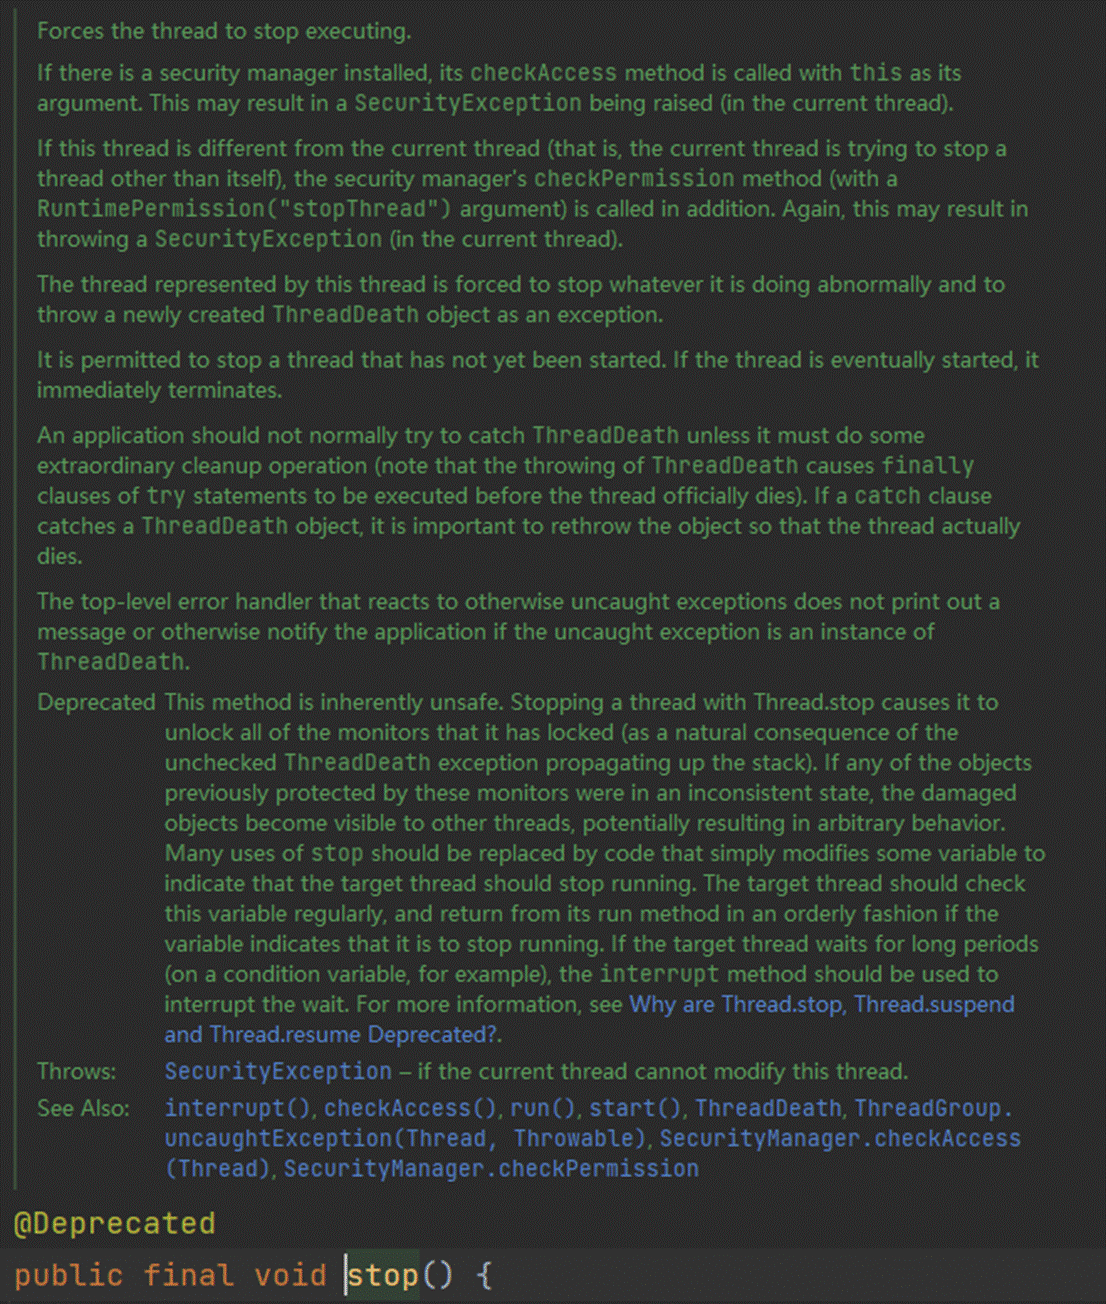
stop 方法虽然可以停止线程,但它已经是不建议使用的废弃方法了,这一点可以通过 Thread 类中的源码发现,stop 源码如下:

stop 方法是被 @Deprecated 修饰的不建议使用的过期方法,并且在注释的第一句话就说明了 stop 方法为非安全的方法。
原因在于它在终止一个线程时会强制中断线程的执行,不管run方法是否执行完了,并且还会释放这个线程所持有的所有的锁对象。这一现象会被其它因为请求锁而阻塞的线程看到,使他们继续向下执行。这就会造成数据的不一致。
比如银行转账,从A账户向B账户转账500元,这一过程分为三步,第一步是从A账户中减去500元,假如到这时线程就被stop了,那么这个线程就会释放它所取得锁,然后其他的线程继续执行,这样A账户就莫名其妙的少了500元而B账户也没有收到钱。这就是stop方法的不安全性。
设置标志位
如果线程的run方法中执行的是一个重复执行的循环,可以提供一个标记来控制循环是否继续
class FlagThread extends Thread {
    // 自定义中断标识符
    public volatile boolean isInterrupt = false;
    @Override
    public void run() {
        // 如果为 true -> 中断执行
        while (!isInterrupt) {
            // 业务逻辑处理
        }
    }
}
但自定义中断标识符的问题在于:线程中断的不够及时。因为线程在执行过程中,无法调用 while(!isInterrupt) 来判断线程是否为终止状态,它只能在下一轮运行时判断是否要终止当前线程,所以它中断线程不够及时,比如以下代码:
class InterruptFlag {
    // 自定义的中断标识符
    private static volatile boolean isInterrupt = false;

    public static void main(String[] args) throws InterruptedException {
        // 创建可中断的线程实例
        Thread thread = new Thread(() -> {
            while (!isInterrupt) { // 如果 isInterrupt=true 则停止线程
                System.out.println("thread 执行步骤1:线程即将进入休眠状态");
                try {
                    // 休眠 1s
                    Thread.sleep(1000);
                } catch (InterruptedException e) {
                    e.printStackTrace();
                }
                System.out.println("thread 执行步骤2:线程执行了任务");
            }
        });
        thread.start(); // 启动线程

        // 休眠 100ms,等待 thread 线程运行起来
        Thread.sleep(100);
        System.out.println("主线程:试图终止线程 thread");
        // 修改中断标识符,中断线程
        isInterrupt = true;
    }
}
输出:我们期望的是:线程执行了步骤 1 之后,收到中断线程的指令,然后就不要再执行步骤 2 了,但从上述执行结果可以看出,使用自定义中断标识符是没办法实现我们预期的结果的,这就是自定义中断标识符,响应不够及时的问题。

interrupted中断
这种方式需要在while循环中判断使用
使用 interrupt 方法可以给执行任务的线程,发送一个中断线程的指令,它并不直接中断线程,而是发送一个中断线程的信号,把是否正在中断线程的主动权交给代码编写者。相比于自定义中断标识符而然,它能更及时的接收到中断指令,如下代码所示:
public static void main(String[] args) throws InterruptedException {
    // 创建可中断的线程实例
    Thread thread = new Thread(() -> {
        while (!Thread.currentThread().isInterrupted()) {
            System.out.println("thread 执行步骤1:线程即将进入休眠状态");
            try {
                // 休眠 1s
                Thread.sleep(1000);
            } catch (InterruptedException e) {
                System.out.println("thread 线程接收到中断指令,执行中断操作");
                // 中断当前线程的任务执行
                break;
            }
            System.out.println("thread 执行步骤2:线程执行了任务");
        }
    });
    thread.start(); // 启动线程

    // 休眠 100ms,等待 thread 线程运行起来
    Thread.sleep(100);
    System.out.println("主线程:试图终止线程 thread");
    // 修改中断标识符,中断线程
    thread.interrupt();
}
输出:

从上述结果可以看出,线程在接收到中断指令之后,立即中断了线程,相比于上一种自定义中断标识符的方法来说,它能更及时的响应中断线程指令。
利用interruptedException
这种方式 不 需要在while循环中判断使用
如果线程因为执行join(),sleep或者wait()而进入阻塞状态,此时想要停止它,可以调用interrupt(),程序会抛出interruptedException异常。可以利用这个异常终止线程
public void run() {
    System.out.println(this.getName() + "start");
    int i=0;
    //while (!Thread.interrupted()){
    while (!Thread.currentThread().isInterrupted()){
        try {
            Thread.sleep(10000);
        } catch (InterruptedException e) {
            //e.printStackTrace();
            System.out.println("中断线程");
            break;//通过识别到异常来中断
        }
        System.out.println(this.getName() + " "+ i);
        i++;
    }
    System.out.println(this.getName() + "end");
}

Executor 的中断操作
调用 Executor 的 shutdown() 方法会等待线程都执行完毕之后再关闭,但是如果调用的是 shutdownNow() 方法,则相当于调用每个线程的 interrupt() 方法。
以下使用 Lambda 创建线程,相当于创建了一个匿名内部线程。
public static void main(String[] args) {
    ExecutorService executorService = Executors.newCachedThreadPool();
    executorService.execute(() -> {
        try {
            Thread.sleep(2000);
            System.out.println("Thread run");
        } catch (InterruptedException e) {
            e.printStackTrace();
        }
    });
    executorService.shutdownNow();
    System.out.println("Main run");
}
Main run
java.lang.InterruptedException: sleep interrupted
    at java.lang.Thread.sleep(Native Method)
    at ExecutorInterruptExample.lambda$main$0(ExecutorInterruptExample.java:9)
    at ExecutorInterruptExample$$Lambda$1/1160460865.run(Unknown Source)
    at java.util.concurrent.ThreadPoolExecutor.runWorker(ThreadPoolExecutor.java:1142)
    at java.util.concurrent.ThreadPoolExecutor$Worker.run(ThreadPoolExecutor.java:617)
    at java.lang.Thread.run(Thread.java:745)
如果只想中断 Executor 中的一个线程,可以通过使用 submit() 方法来提交一个线程,它会返回一个 Future<?> 对象,通过调用该对象的 cancel(true) 方法就可以中断线程。
Future<?> future = executorService.submit(() -> {
    // ..
});
future.cancel(true);
线程之间的协作
当多个线程可以一起工作去解决某个问题时,如果某些部分必须在其它部分之前完成,那么就需要对线程进行协调。
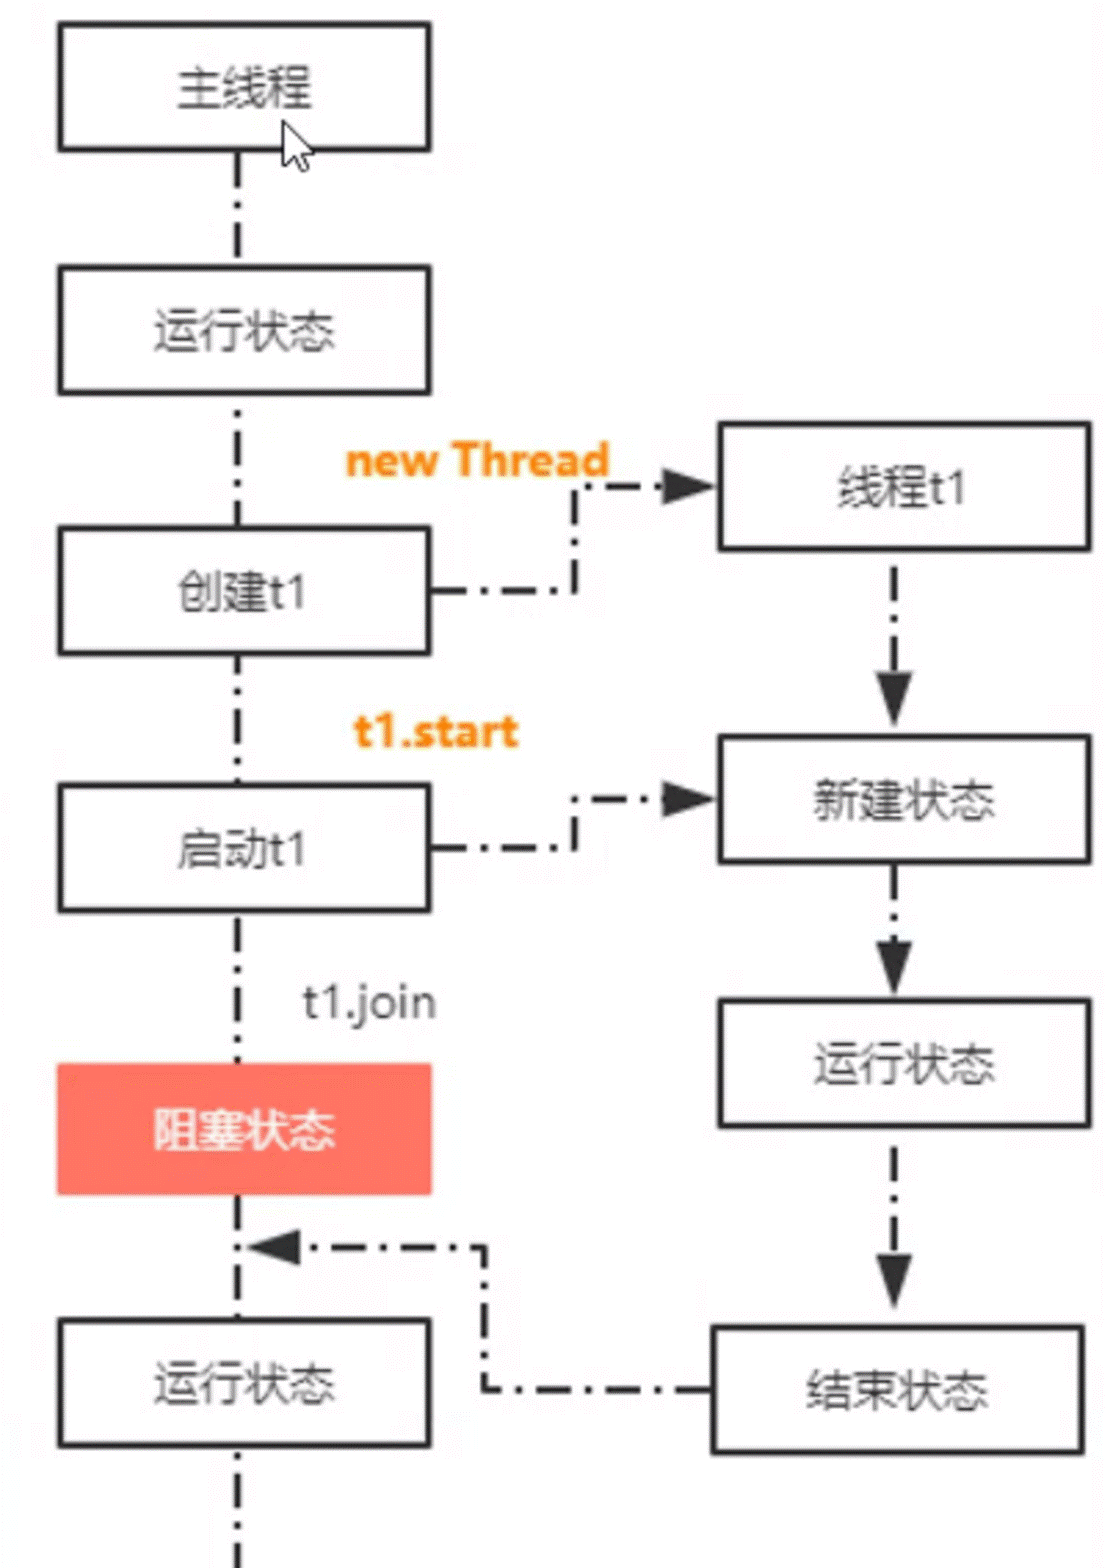
join()
案例
在线程中调用另一个线程的 join() 方法,会将当前线程挂起,而不是忙等待,直到目标线程结束。
对于以下代码,虽然 b 线程先启动,但是因为在 b 线程中调用了 a 线程的 join() 方法,b 线程会等待 a 线程结束才继续执行,因此最后能够保证 a 线程的输出先于 b 线程的输出。
public class JoinExample {

    private class A extends Thread {
        @Override
        public void run() {
            System.out.println("A");
        }
    }

    private class B extends Thread {

        private A a;

        B(A a) {
            this.a = a;
        }

        @Override
        public void run() {
            try {
                a.join();
            } catch (InterruptedException e) {
                e.printStackTrace();
            }
            System.out.println("B");
        }
    }

    public void test() {
        A a = new A();
        B b = new B(a);
        b.start();
        a.start();
    }
}
public static void main(String[] args) {
    JoinExample example = new JoinExample();
    example.test();
}
A
B
原理

public final synchronized void join(long millis)
throws InterruptedException {
    long base = System.currentTimeMillis();
    long now = 0;

    if (millis < 0) {
        throw new IllegalArgumentException("timeout value is negative");
    }

    if (millis == 0) {
        while (isAlive()) {//检查线程是否存活,只要线程还没结束,主线程就会一直阻塞
            wait(0);//这里的wait调用的本地方法。
        }
    } else {//等待一段指定的时间
        while (isAlive()) {
            long delay = millis - now;
            if (delay <= 0) {
                break;
            }
            wait(delay);
            now = System.currentTimeMillis() - base;
        }
    }
}
从源码来看,实际上join方法就是调用了wait方法来使得线程阻塞,一直到线程结束运行。注意到,join方法前的synchronized修饰符,它相当于:
public final void join(long millis){
 synchronized(this){
        //代码块
    }
}
也就是说加锁的对象即调用这个锁的线程对象,在main()方法中即为t1,持有这个锁的是主线程即main()方法,也就是说代码相当于如下:
//t1.join()前的代码
synchronized (t1) {
 // 调用者线程进入 t1 的 waitSet 等待, 直到 t1 运行结束
 while (t1.isAlive()) {
  t1.wait(0);
 }
}
//t1.join()后的代码
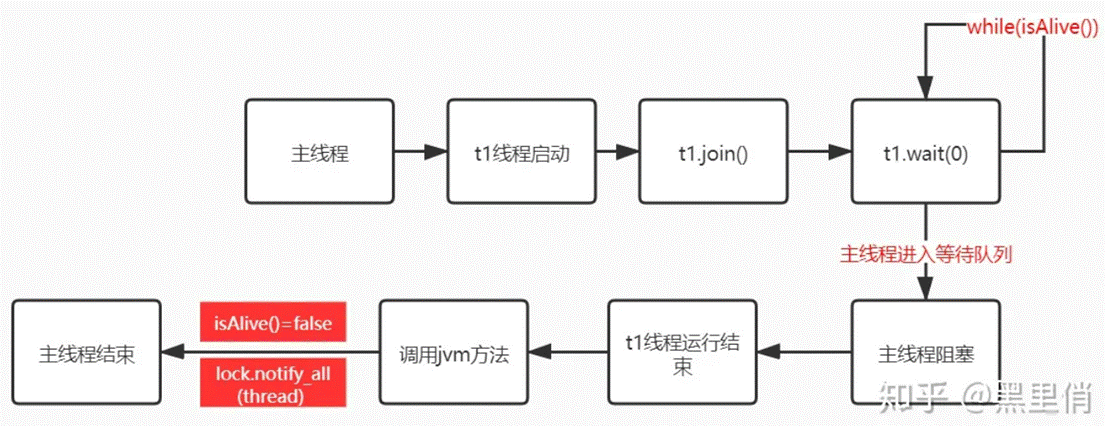
也因此主线程进入等待队列,直到 t1 线程结束。
这里可能会有很多人会有疑惑,为什么t1.wait了,阻塞的不是t1,而是主线程?
实际上,如果要阻塞t1,那么就应该在t1的run 方法里进行阻塞,如在run方法里写wait();(当然还有suspend方法,这属于非Java层面,另说)
而这里的 wait 方法被调用以后,是让持有锁的线程进入等待队列,即主线程调用,因此 t1 线程并不会被阻塞,阻塞的是主线程。
也就是说,join方法是一个同步方法,当主线程调用t1.join()方法时,主线程先获得了t1对象的锁,随后进入方法,调用了t1对象的wait()方法,使主线程进入了t1对象的等待池。
那么问题在于,这里只看到了wait方法,却并没有看到notify或者是notifyAll方法,那么主线程在那里被唤醒呢?
这里参考jvm的代码:
static void ensure_join(JavaThread* thread) {

 Handle threadObj(thread, thread->threadObj());

 ObjectLocker lock(threadObj, thread);

 hread->clear_pending_exception();

 //这一句中的TERMINATED表示这是线程结束以后运行的
 java_lang_Thread::set_thread_status(threadObj(), java_lang_Thread::TERMINATED);

    //这里会清楚native线程,isAlive()方法会返回false
    java_lang_Thread::set_thread(threadObj(), NULL);

 //thread就是当前线程,调用这个方法唤醒等待的线程。
 lock.notify_all(thread);

 hread->clear_pending_exception();

}
其实是jvm虚拟机中存在方法lock.notify_all(thread),在t1线程结束以后,会调用该方法,最后唤醒主线程。
所以简化一下,流程即:

wait() notify() notifyAll()
调用 wait() 使得线程等待某个条件满足,线程在等待时会被挂起,当其他线程的运行使得这个条件满足时,其它线程会调用 notify() 或者 notifyAll() 来唤醒挂起的线程。
它们都属于 Object 的一部分,而不属于 Thread。
只能用在同步方法synchronized或者同步控制块中使用,否则会在运行时抛出 IllegalMonitorStateExeception。
使用 wait() 挂起期间,线程会释放锁。这是因为,如果没有释放锁,那么其它线程就无法进入对象的同步方法或者同步控制块中,那么就无法执行 notify() 或者 notifyAll() 来唤醒挂起的线程,造成死锁。
public class WaitNotifyExample {
    public synchronized void before() {
        System.out.println("before");
        notifyAll();
    }

    public synchronized void after() {
        try {
            wait();
        } catch (InterruptedException e) {
            e.printStackTrace();
        }
        System.out.println("after");
    }
}
public static void main(String[] args) {
    ExecutorService executorService = Executors.newCachedThreadPool();
    WaitNotifyExample example = new WaitNotifyExample();
    executorService.execute(() -> example.after());
    executorService.execute(() -> example.before());
}
before
after
wait() 和 sleep() 的区别
-
wait() 是 Object 的方法,而 sleep() 是 Thread 的静态方法;
-
wait() 会释放锁,sleep() 不会。
await() signal() signalAll()
java.util.concurrent 类库中提供了 Condition 类来实现线程之间的协调,可以在 Condition 上调用 await() 方法使线程等待,其它线程调用 signal() 或 signalAll() 方法唤醒等待的线程。相比于 wait() 这种等待方式,await() 可以指定等待的条件,因此更加灵活。
使用 Lock 来获取一个 Condition 对象。
public class AwaitSignalExample {
    private Lock lock = new ReentrantLock();
    private Condition condition = lock.newCondition();

    public void before() {
        lock.lock();
        try {
            System.out.println("before");
            condition.signalAll();
        } finally {
            lock.unlock();
        }
    }

    public void after() {
        lock.lock();
        try {
            condition.await();
            System.out.println("after");
        } catch (InterruptedException e) {
            e.printStackTrace();
        } finally {
            lock.unlock();
        }
    }
}
public static void main(String[] args) {
    ExecutorService executorService = Executors.newCachedThreadPool();
    AwaitSignalExample example = new AwaitSignalExample();
    executorService.execute(() -> example.after());
    executorService.execute(() -> example.before());
}
before
after
线程中的异常处理
Runnable中异常如何被吞掉
Runnable 接口的 run() 方法不允许抛出任何被检查的异常(checked exceptions),只能处理或抛出运行时异常(unchecked exceptions)。当在 run() 方法内发生异常时,如果没有显式地捕获和处理这些异常,它们通常会在执行该 Runnable 的线程中被“吞掉”,即异常会导致线程终止,但不会影响其他线程的执行。
public void uncaughtException(Thread t, Throwable e) {
   if (parent != null) {
        parent.uncaughtException(t, e);
   } else {
        Thread.UncaughtExceptionHandler ueh =
            Thread.getDefaultUncaughtExceptionHandler();
        if (ueh != null) {
            ueh.uncaughtException(t, e);
        } else if (!(e instanceof ThreadDeath)) {
            System.err.print("Exception in thread \""
                             + t.getName() + "\" ");
            e.printStackTrace(System.err);
        }
    }
}
解决方案:
-
在run方法中显示的捕获异常
public void run() { try { // 可能抛出异常的代码 } catch (Exception e) { // 记录日志或处理异常 throw new RuntimeException(e); } } -
为创建的线程设置一个
UncaughtExceptionHandlerThread t = new Thread(() -> { int i = 1 / 0; }, "t1"); t.setUncaughtExceptionHandler(new Thread.UncaughtExceptionHandler() { @Override public void uncaughtException(Thread t, Throwable e) { logger.error('---', e); } }); -
使用
Callable代替Runnable,Callable的call方法允许抛出异常,然后可以通过提交给ExecutorService返回的Future来捕获和处理这些异常ExecutorService executor = Executors.newFixedThreadPool(1); Future<?> future = executor.submit(() -> { // 可能抛出异常的代码 }); try { future.get(); // 这里会捕获到Callable中的异常 } catch (ExecutionException e) { Throwable cause = e.getCause(); // 获取原始异常 }
Callable中异常如何被吞掉
class MyCallable implements Callable<String> {
    @Override
    public String call() throws Exception {
        System.out.println("===> 开始执行callable");
        int i = 1 / 0; //异常的地方
        return "callable的结果";
    }
}

public class CallableAndRunnableTest {

    public static void main(String[] args) {
        System.out.println(" =========> main start ");
        ThreadPoolExecutor threadPoolExecutor = new ThreadPoolExecutor(3, 5, 1, TimeUnit.SECONDS, new ArrayBlockingQueue<>(100));
        Future<String> submit = threadPoolExecutor.submit(new MyCallable());
        try {
            TimeUnit.SECONDS.sleep(2);
        } catch (InterruptedException e) {
            e.printStackTrace();
        }
        System.out.println(" =========> main end ");
    }
}
运行结果
 =========> main start
 ===> 开始执行callable
 =========> main end
源码如下:
public <T> Future<T> submit(Callable<T> task) {
    if (task == null) throw new NullPointerException();
    RunnableFuture<T> ftask = newTaskFor(task);
    execute(ftask);
    return ftask;
}

protected <T> RunnableFuture<T> newTaskFor(Callable<T> callable) {
    return new FutureTask<T>(callable);
}
RunableFuture<T> 是个接口,但是它继承了Runnable 接口 , 实现类是 FutureTask ,因此就需要看下 FutureTask里的run方法 是不是和 构造时的Callable 有关系:
public void run() {
     // 状态不属于初始状态的情况下,不进行后续逻辑处理
     // 那也就是run 方法只能执行一次
     if (state != NEW ||
        !UNSAFE.compareAndSwapObject(this, runnerOffset,
                                   null, Thread.currentThread()))
        return;
    try {
        Callable<V> c = callable;
        if (c != null && state == NEW) {
            V result;
            //
            boolean ran;
            try {
                // 执行 Callable 里的 call 方法 ,将结果存入result变量中
                result = c.call();
                ran = true;
            } catch (Throwable ex) {
                result = null;
                ran = false;
                 // call 方法异常 , 记录下异常结果
                setException(ex);
            }
            // call 方法正常执行完毕 ,进行结果存储
            if (ran)
                set(result);
        }
    } finally {
        // runner must be non-null until state is settled to
        // prevent concurrent calls to run()
        runner = null;
        // state must be re-read after nulling runner to prevent
        // leaked interrupts
        int s = state;
        if (s >= INTERRUPTING)
            handlePossibleCancellationInterrupt(s);
    }
}
接下来就要看,如果存储正常结果的set(result)方法 和存储异常结果的 setException(ex) 方法
protected void setException(Throwable t) {
    if (UNSAFE.compareAndSwapInt(this, stateOffset, NEW, COMPLETING)) {
        outcome = t;
        UNSAFE.putOrderedInt(this, stateOffset, EXCEPTIONAL); // final state
        finishCompletion();
    }
}

protected void set(V v) {
    if (UNSAFE.compareAndSwapInt(this, stateOffset, NEW, COMPLETING)) {
        outcome = v;
        UNSAFE.putOrderedInt(this, stateOffset, NORMAL); // final state
        finishCompletion();
    }
}
这两个代码都做了一个操作,就是将正常结果result 和 异常结果 exception 都赋值给了 outcome 这个变量 。
接着再看下future的get方法
//这里有必须看下Task的结束时的状态,如果正常结束,状态为 NORMAL , 异常结果,状态为EXCEPTIONAL 。 看下几个状态的定义,如下:
private volatile int state;
private static final int NEW          = 0;
private static final int COMPLETING   = 1;
private static final int NORMAL       = 2;
private static final int EXCEPTIONAL  = 3;
private static final int CANCELLED    = 4;
private static final int INTERRUPTING = 5;
private static final int INTERRUPTED  = 6;

/**
* @throws CancellationException {@inheritDoc}
*/
public V get() throws InterruptedException, ExecutionException {
    int s = state;
    // NORMAL(2) 、EXCEPTIONAL(3) 都大于 COMPLETING(1),所以Task结束之后,不会走该if
    if (s <= COMPLETING)
         s = awaitDone(false, 0L);
    // 重点: 返回结果
    return report(s);
}

private V report(int s) throws ExecutionException {
    // 之前正常结果或者异常都存放在Object outcomme 中了
    Object x = outcome;
    // 正常返回
    if (s == NORMAL)
        return (V)x;
    // EXCEPTIONAL(3) 小于 CANCELLED(4) ,所以不会走该if分支,直接后续的throw 抛异常的逻辑
    if (s >= CANCELLED)
        throw new CancellationException();
    // 不等于NORMAL 且 大于等于 CANCELLED  ,  再结合 调用 report(int s ) 之前也做了state 的过滤
    //到这一步,那只能是EXCEPTIONAL(3)
    throw new ExecutionException((Throwable)x);
}
因此可以通过get方法获取到异常结果
关于作者
来自一线程序员Seven的探索与实践,持续学习迭代中~
本文已收录于我的个人博客:https://www.seven97.top
公众号:seven97,欢迎关注~
本文来自互联网用户投稿,该文观点仅代表作者本人,不代表本站立场。本站仅提供信息存储空间服务,不拥有所有权,不承担相关法律责任。如若内容造成侵权/违法违规/事实不符,请联系邮箱:jacktools123@163.com进行投诉反馈,一经查实,立即删除!
标签:

